Adding site search to Netlify sites using Elasticsearch
Static site generators (SSGs) such as 11ty allow us to build super-fast websites with great developer experience. Hosting platforms like Netlify allow us to rapidly iterate and release directly from GitHub.
SSGs are perfect for (mostly) static sites such as blogs (like this one!), corporate sites, documentation sites etc. Search, however, is not static. You can build static-ish site search using solutions such as Pagefind but these solutions have limitations in hosting environments and flexibility.
SaaS search solutions like Algolia have their place too, but the official Algolia x Netlify integration simply triggers a web crawl of a site rather than indexing content directly. Again, this limits flexibility and results in a delay between build and updating the search index.
As a fan of elasticsearch I thought I would have a go at implementing search on this site using pure 11ty, Netlify and Elastic capabilities:
- Create a search index at build time with 11ty
- Update a remote elasticsearch index after build
- Use an Elastic search application to create a simple search experience
- Use Elastic Behavioral Analytics to capture search & click data
Sounds simple enough! Let's walk through the steps:
Create a search index at build time
There are a number of ways to do this, but I took the route that seemed the most simple to me - using nunjucks. I added a new nunjucks filter and a page template to render blog posts as ndjson, which will be important later:
/* --- eleventy.js --- */
eleventyConfig.addNunjucksFilter("ndjson", (page)=> {
  let d = new Date();
  return JSON.stringify({
    'url': 'https://simonhearne.com'+page.url,
    'tags': page.data.tags,
    'published': page.date,
    'title': page.data.title,
    'excerpt': page.data.excerpt,
    'image': page.data.image,
    'indexed': d.toISOString()
  });
});{# --- esindex.ndjson.njk --- #}
---
permalink: /esindex.ndjson
eleventyExcludeFromCollections: true
---
{%- for post in collections.posts %}
{ "index": {"_id": "{{post.url}}"}}
{{ post | ndjson | safe }}
{%- endfor %}This creates a new file at build time, esindex.ndjson, at the root of the published site directory.
It should look a little like this:
{ "index": {"_id": "/2015/web-performance-optimisation-basics/"}}
{"url":"https://simonhearne.com/2015/web-performance-optimisation-basics/","tags":["posts","WebPerf"],"published":"2015-03-11T19:54:00.000Z","title":"Web Performance Optimisation Basics","excerpt":"Website performance is critical to user experience. We need rules to make it easier.","image":"./images/speed_hero.jpg","indexed":"2024-05-07T11:47:22.116Z"}
...
Note that this ndjson file corresponds to the format required for the elasticsearch _bulk API. I've set the _id of each document to the path of the page, this is unique in my context and means that further indexing requests to existing documents in elasticsearch will replace the older document.
Index the data to elasticsearch
We can validate the bulk data created above by POSTing it to an elasticsearch instance (assuming you have the relevant variables set):
curl -XPOST -H \"Content-Type: application/x-ndjson\" -H \"Authorization: ApiKey $ELASTIC_APIKEY\" $ELASTIC_HOST/$ELASTIC_INDEX/_bulk --data-binary @_site/esindex.ndjsonIf that works as expected, we can lazily add it to our build command:
# --- netlify.toml --- #
[build]
  publish = "_site"
  command = "npm run build && curl -XPOST -H \"Content-Type: application/x-ndjson\" -H \"Authorization: ApiKey $EAK\" $ELASTIC_HOST/$ELASTIC_INDEX/_bulk --data-binary @_site/esindex.ndjson"
You will need to add your variables to your Netlify config of course!
Create a search application
Search Applications allow you to create a public API endpoint against an elasticsearch instance. Our use case is simple but you can do all sorts with search applications!
I've set my index name $ELASTIC_INDEX to search-simonhearne (original I know) so creating my search application (called simonhearne) is as simple as a single PUT via Kibana dev tools:
PUT /_application/search_application/simonhearne
{
  "indices": [ "search-simonhearne" ],
  "template": {
    "script": {
      "source": {
        "fields": ["title","tags","url","excerpt","published","image"],
        "query": {
          "bool": {
            "should": [
              {
                "multi_match": {
                  "query": "",
                  "fields": ["title^4","tags","excerpt","url"],
                  "fuzziness": "auto"
                }
              },
              {
                "multi_match": {
                  "query": "",
                  "fields": ["title^4","tags","excerpt","url"],
                  "type": "phrase_prefix"
                }
              }
            ]
          }
      	},
      	"from": "",
      	"size": "",
    	  "highlight": {
          "fields": {
            "title": {},
            "excerpt": {}
          },
          "tags_schema" : "styled",
          "fragment_size": 150,
          "number_of_fragments": 1,
          "type": "plain"
        }
      },
      "params": {
        "query": "*",
        "from": 0,
        "size": 10
      }
    }
  }
}
This request is doing quite a lot, defining the query I want the search application to run (against the post title, tags, excerpt and url) with relevant weightings, also to run a phase prefix query to provide a bit of query completion logic. I've also enabled highlighting to enable me to show highlights in the search results.
We can test this search application with a simple POST against the application endpoint:
POST _application/search_application/simonhearne/_search
{
  "params": {
    "query": "velo"
  }
}
Implementing the search client
We need to create an API key for the search application to allow public API requests:
POST /_security/api_key
{
  "name": "public api key",
  "role_descriptors": {
    "my-restricted-role-descriptor": {
      "indices": [
        {
          "names": ["simonhearne"],
          "privileges": ["read"]
        }
      ],
      "restriction":  {
        "workflows": ["search_application_query"]
      }
    }
  }
}
With the API key, we can now construct a client-side API call:
const searchEndpoint = "<elasticsearch-host>/_application/search_application/simonhearne/_search"
const apiKey = "<base64 apiKey>"

const body =
  {
    "params": {
      "query": term
    }
  };
let response = await fetch(searchEndpoint, {
  method: 'POST',
  mode: 'cors',
  headers: {
    'Authorization': `apiKey ${apiKey}`,
    'Content-Type': 'application/json'
  },
  body: JSON.stringify(body)
});
And render the results (using a template literal function in this case):
const postTemplate = (result,term,position) => `
<li class="postlist-item" data-query="${term}" data-id="${result._id}" data-index="${result._index}" data-position="${position}">
  <div class="hero-img-container">
    <a href="${result.fields.url[0]}" class="no-outline"><img src="${result.fields.image[0].slice(1)}" width="1200" height="675" onclick="sendClick(this)"></img></a>
  </div>
  <div class="meta-container">
    <div class="post-title"><a href="${result.fields.url[0]}" class="postlist-link" onclick="sendClick(this)">${(result.hasOwnProperty('highlight') && result.highlight.hasOwnProperty('title')) ? result.highlight.title[0] : result.fields.title}</a></div>
    <time class="postlist-date">${new Date(result.fields.published[0]).toLocaleDateString()}</time>
    <div class="post-description">${(result.hasOwnProperty('highlight') && result.highlight.hasOwnProperty('excerpt')) ? result.highlight.excerpt[0] : result.fields.excerpt}</div>
  </div>
</li>`;
Note that there is a search application client library which can do this for you, I just prefer hacking away at HTML and JS manually.
Enable Analytics
Elastic Behavioral Analytics allows you to capture and view simple analytics of search events. The documentation covers the important stuff so I'll just mention how I've implemented it.
I host the analytics locally and load it only on the search page, deferred to prevent blocking render:
<script>
  function bootstrapAnalytics() {
    window.elasticAnalytics.createTracker({
      endpoint: "<elasticsearch-host>",
      collectionName: "<collection-name>",
      apiKey: "<apiKey>",
    });
  }
</script>
<script src="/js/behavioral-analytics-browser-tracker.2.0.0.min.js" defer onload="bootstrapAnalytics()"></script>
Tracking search events
On each search execution I run this function to send the relevant analytics event:
function sendAnalytics(query,results,total) {
  if (window.elasticAnalytics) {
    window.elasticAnalytics.trackSearch({
      search: {
        query: query,
        search_application: "simonhearne",
        results: {
          total_results: total,
          items: results.map(res=> {
            return {
              'document':{
                'id':res._id,
                'index':res._index
              },
              'page':{
                'url':res.fields.url[0]
              }
            }
          })
        }
      }
    });
  }
}
Tracking search clicks
Each search result link has an event listener to send an analytics beacon on click, using data attributes added in the postTemplate documented above:
function sendClick(e) {
  if (window.elasticAnalytics) {
    let el = e.closest('[data-index]');
    window.elasticAnalytics.trackSearchClick({
      'document': {
        'id': el.dataset.id,
        'index': el.dataset.index
      },
      'search': {
        'query': el.dataset.query,
        'search_application': 'simonhearne'
      }
    })
  }
}
Results
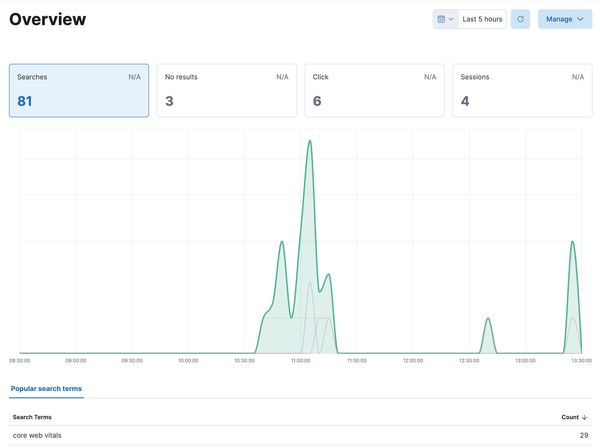
You should now have a dashboard in Kibana with your search analytics!
Productionising
In my case I just wanted something that worked and did not take too much care on production readiness. There are a few further tasks I would complete for a 'proper' deployment:
- delete the source
ndjsonfile after indexing - configure separate indices for lower environments
- take language into account
- tune the search query based on the analytics results
Overall I spent about three hours building this search solution, with an existing elasticsearch cluster ready to use.