Measuring Performance behind consent popups
Introduction
Cookie consent has given users control over the data that is shared with websites and third-parties, but it has made measuring performance difficult. Cookie consent is managed outside of standard APIs, so it can be implemented any way a website wants. Within the EU (and generally for websites hosted in the EU) consent is not assumed, so a visitor must opt-in to third-party tracking etc.
This makes testing performance difficult as standard synthetic test tools such as WebPageTest will only measure the opted-out experience. Conversely, real user measurement (RUM) tools such as mPulse will only measure the opted-in experience. See the problem? This also means that large-scale datasets such as HTTP Archive and Google's CrUX present the performance of the opted-out and opted-in experience, respectively.
The problem with RUM data is generally unavoidable, as performance measurement is not a functional requirement, although few websites have so far implemented a true opt-in solution for performance tracking. For reference, mPulse provides the inline consent plugin as a simple method to implement this correctly.
The problem of synthetic tests is thankfully more simple to solve: we simply need to have the test 'opt-in' as a user would. Once we have the ability to opt-in, there will be multiple scenarios we can explore:
- Opted-out first view - this is the easy one
- Opted-out repeat view - cached experience
- Opted-in first view - consent is given, page not cached
- Opt-in after page load - measure just the opt-in activity
- Opted-in repeat view - cached experience, with cookies
The results can be... eye opening. In the following sections we will walk through how to succesfully test these states, how to compare the results and present a small case study based on a corporate website.
Opt-in Techniques
There are generally two methods to test the opt-in process in synthetic tests: setting the opt-in cookie manually or effectively clicking on the "accept" or "I agree" elements. I'll show you how to do both using WebPageTest scripts, this is one of the many surprisingly powerful features of WPT and I recommend reading up on the documentation. To learn even more about WPT, I recommend you grab a copy of the book Using WebPageTest
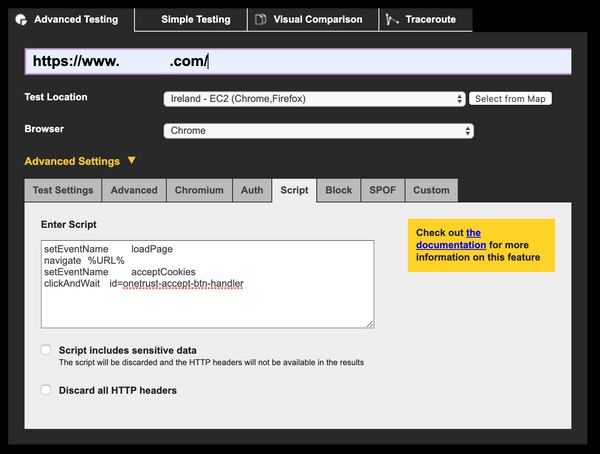
The Script UI is shown below for reference.
Setting an opt-in cookie
This can actually be quite tricky and requires some detective work. Consent is normally stored in a cookie, which means we can simulate the opt-in state by setting that cookie value manually. First, though, we need to find out what cookie to set!
Open a new private / incognito tab and crack open the developer tools on your browser of choice. Head to the section which shows cookies (Application in Chrome) and load the page under test.
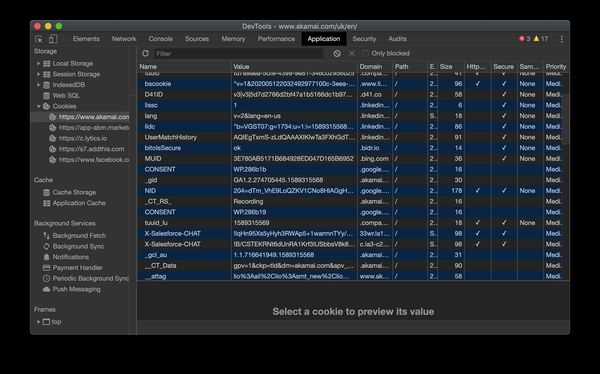
Observe the cookies that are set on the initial page load (and screenshot them if you wish). Then accept the cookie banner and watch what changes! Unfortunately, there are likely to be a lot of new cookies, so spotting the one you care about can be difficult. Here, for example, is an enticingly named CONSENT cookie, but it is not the cookie we are looking for. We can tell this as the cookie domain is google.com, not that of the page under test:
You can also try filtering the cookies by the term consent to see if anything jumps out, and if all else fails? View-source!
If you view-source and search for "cookie" or "consent", you are likely to find the script responsible for the cookie banner. It might look something like this:
<!-- OneTrust Cookies Consent Notice start -->
<script src="https://cdn.cookielaw.org/scripttemplates/otSDKStub.js" type="text/javascript"></script>
<script type="text/javascript">
function OptanonWrapper() {window.dataLayer.push({event:'OneTrustGroupsUpdated'});}
</script>
<!-- OneTrust Cookies Consent Notice end -->
This in turn points me at https://cdn.cookielaw.org/scripttemplates/otSDKStub.js. Loading that script shows me right at the top of the file: this.optanonCookieName="OptanonConsent". Sleuthing complete! Back in developer tools we can filter cookies to OptanonConsent and see if any have been set.
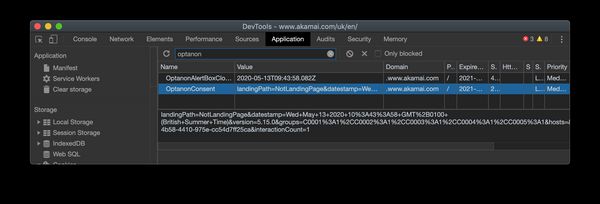
Once you have the cookie, copy the value that has been set. It may be something simple like true or 1, or it could be more obtuse and include a unique ID, timestamp and any number of other variables. We can add the cookie to our test scripts using a WebPageTest script and the setCookie command. Note that the domain should have http:// as the protocol and should not have a trailing slash. Double check this if you see results like (Test Error: Unhandled exception in test run: coercing to Unicode: need string or buffer, int found)
setCookie http://www.akamai.com OptanonConsent=consentId=1f6c1653-871e-468d-913c-378d05a8539e&datestamp=Tue+May+12+2020+21%3A42%3A07+GMT%2B0100+(British+Summer+Time)&version=5.15.0&interactionCount=2&isIABGlobal=false&landingPath=NotLandingPage&groups=&hosts=&legInt=
setCookie http://www.akamai.com OptanonAlertBoxClosed=2020-05-13T06:20:21.745Z
navigate %URL%
If the cookie value has a timestamp it may become invalid after a while, so if you are running these tests in an automated environment (e.g. CI testing or monitoring) then you may need to make this dynamic at the time of the test.
You may also notice that I've set two cookies in the script above. The first is the actual consent, allowing Google Tag Manager to inject third-parties. The second is necessary to prevent the consent banner re-appearing. Why are they separate? Who knows.
Clicking on the Element
This is more simple, conceptually, than setting the cookie in a script. Here we emulate a user actively opting in by triggering the event in the website's code. To do this in WPT, we just need a valid selector for the accept action. Right-click on the element in your browser of choice and hit "Inspect".

Once you have the element highlighted in the developer tools window, you can quickly observe if there is an easy selector such as an element ID (present in this example). If not, you can right-click on the element here and copy a selector. This can often end up being pretty long if the element does not have an ID, but it should at least give you a good starting point:
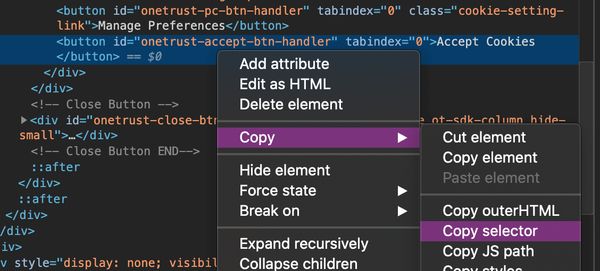
Once you have your selector, check it works by heading to the browser console and attempting to select it:
document.querySelector('#onetrust-accept-btn-handler')If the result is the element then you are on to a winner! We now just need to add this to our WPT script. There are a number of ways to do this, including WPT functions like click and clickAndWait. I find that this can get frustrating at times when switching between WPT and the browser console, so I tend do use exec or execAndWait which just execute the JavaScript you provide. If you need to chain multiple actions such as opening a modal then clicking a button, make sure your last action is execAndWait and preceding actions are exec. Assuming a simple interation, we will want a script that looks like:
setEventName loadPage
navigate %URL%
setEventName acceptCookies
execAndWait document.QuerySelector('#onetrust-accept-btn-handler').click()
This will load the page at the URL you have entered in the URL field as the first step, then accept cookies and record any further activity as a separate step / page load. If you'd like to combine these you can use combineSteps, although note that there may be a small gap in the waterfall between the page loading and the script executing:
combineSteps
navigate %URL%
execAndWait document.QuerySelector('#onetrust-accept-btn-handler').click()
In this case, the button will be clicked shortly after the initial page load, close to the expected user behaviour. Both test options are valid, and you should try both!
Bonus Tips
Here are a few handy tips for working with WPT and cookie consent prompts.
Clearing up cookies
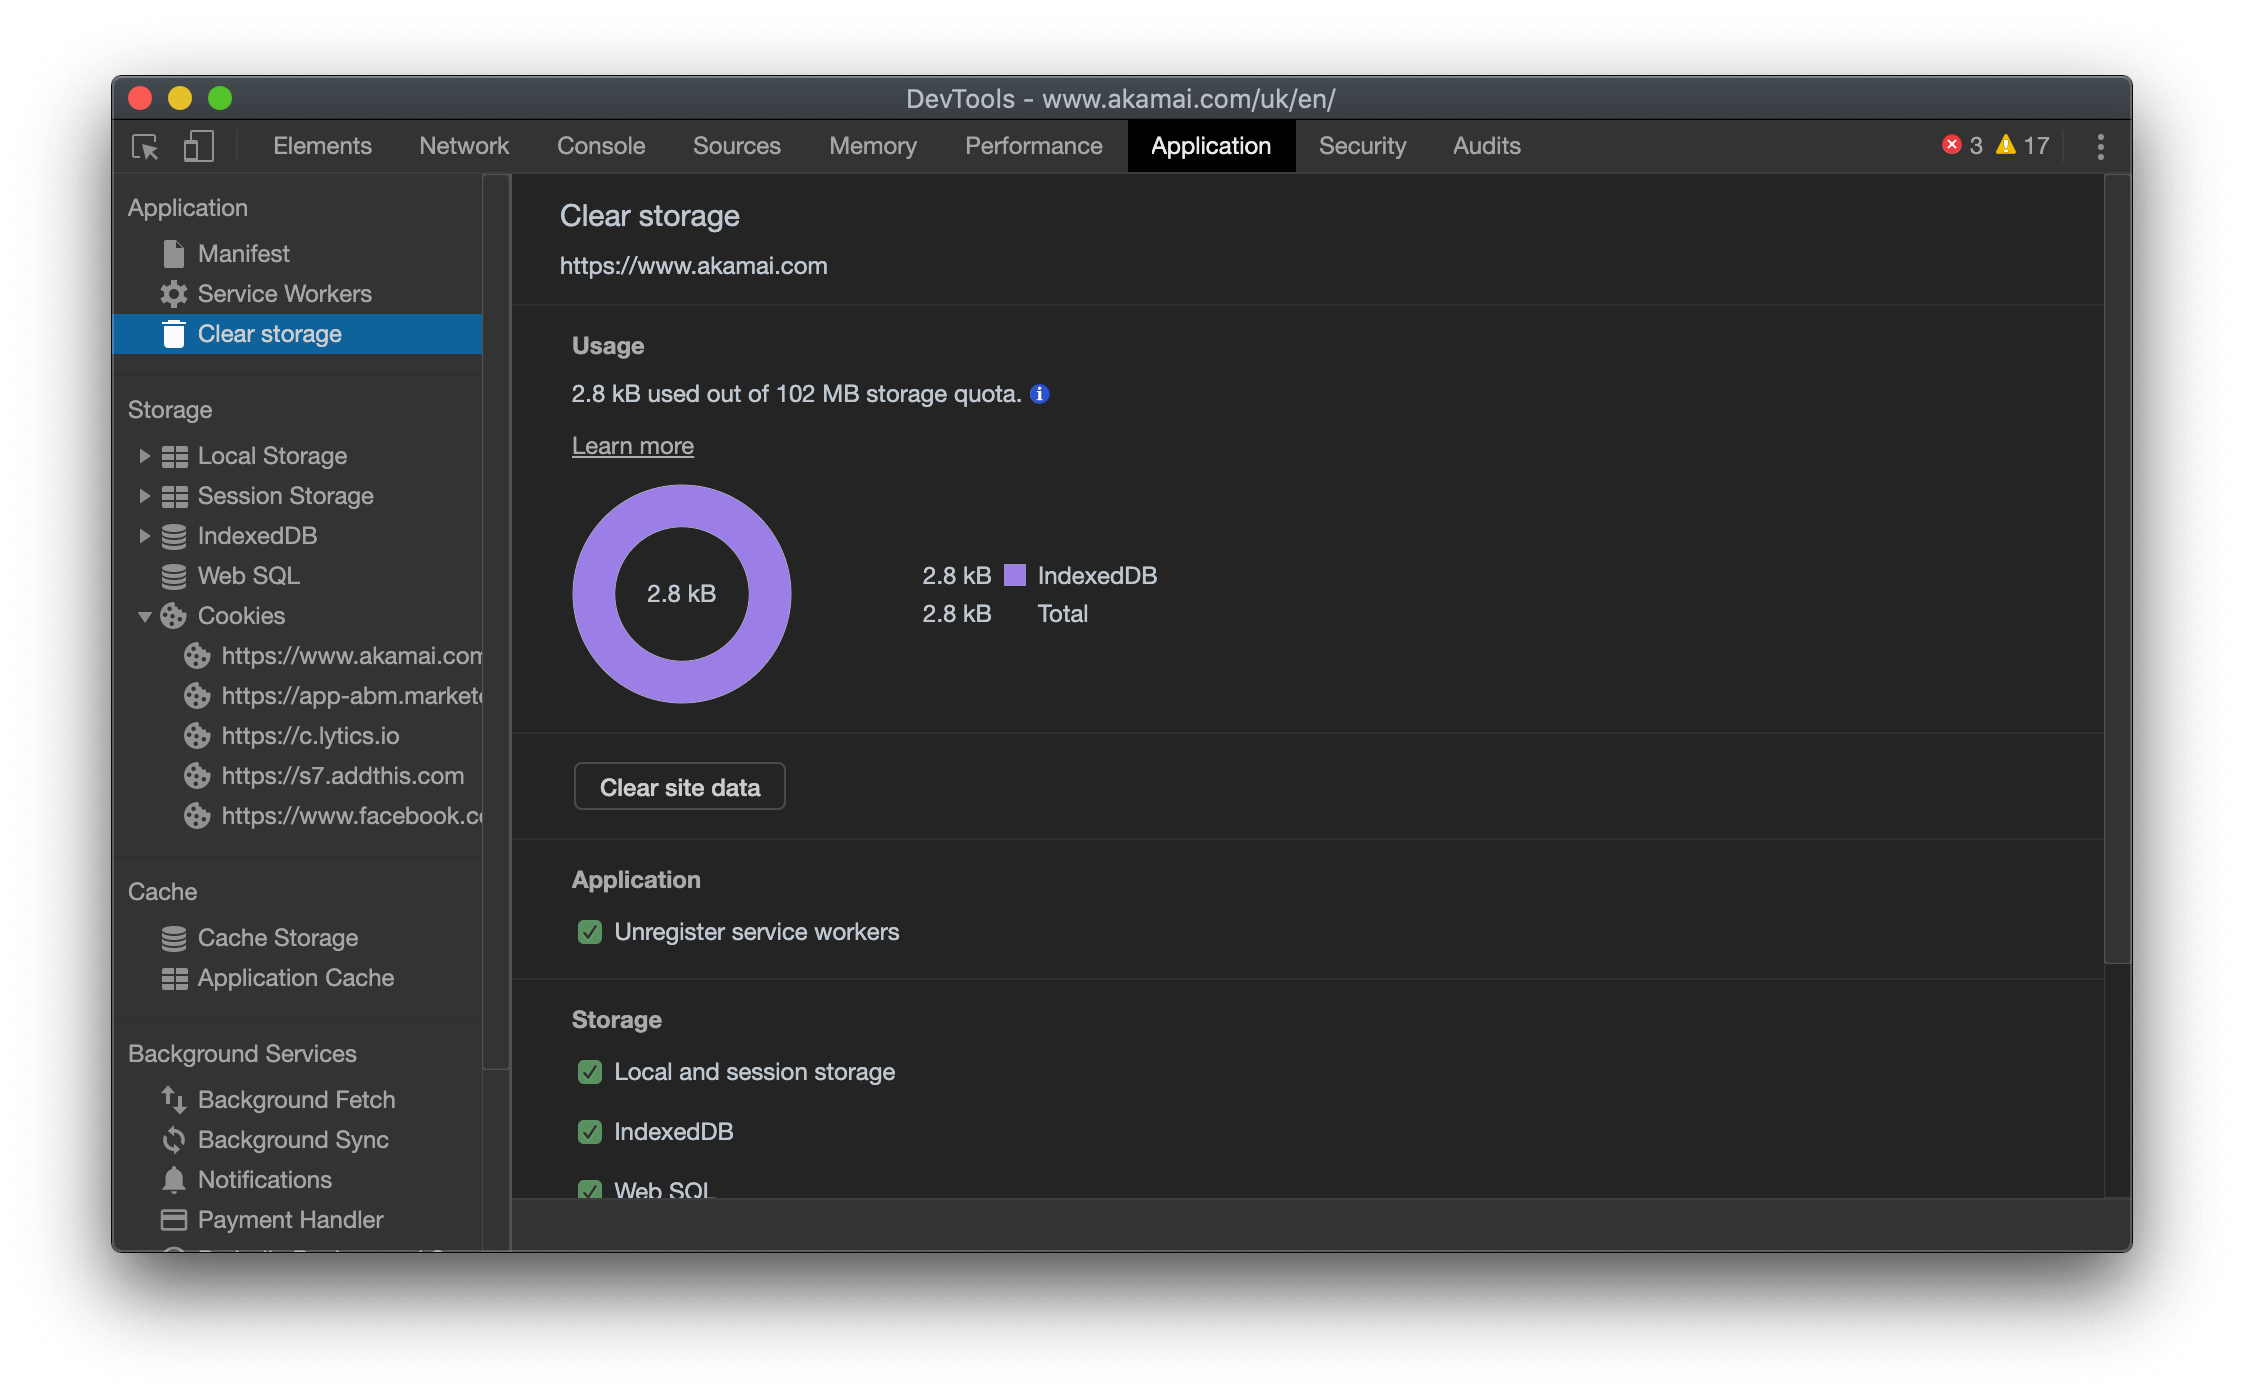
It is quite likely that you will need to emulate a first-time viewer multiple times in this process. The most simple method to reset state is to clear site data. In Chrome, this is under the "Applications" tab. Once cleared, hit Cmd+R / Ctrl+F5 to perform a hard reload.
Debugging WPT Scripts
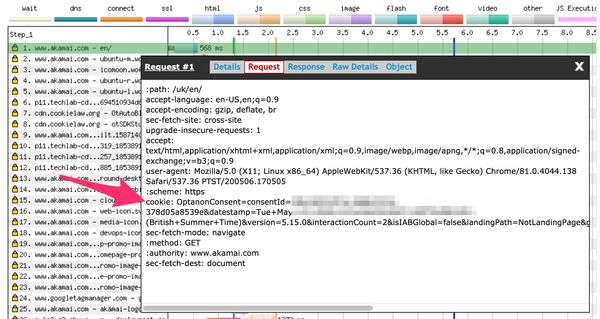
WPT scripts do not provide debugging information, but we can debug the output. In this case we are expecting to see either a cookie being sent with the page request, or an element being clicked in the page load. Use the filmstrip view or page screenshot to check that the page looks as you expect for an opt-in user, i.e. the cookie banner is not present. If the banner is not present, you need to verify that your JavaScript actually works in your browser or check that the cookie value is being set.
To check the cookie value, click on the test waterfall to get to the Details view, then click on the first request to open the modal request viewer. Click on the request tab and check that your cookie header is being set:
If not, you might need to try experimenting with syntax until it works 🙂
Consent Button in iframes
Some cookie consent services may load the banner in an iframe, this makes selecting content a little more tricky. First you need to select the iframe document and then select the button / confirmation element within it:
execAndWait document.querySelector('iframe[name=consentFrame]').contentWindow.document.querySelector('#confirmBtn').click()Geographic Variations
Some sites may have different policies based on the location of the visitor, for example respecting CCPA in California vs. Cookie Law in EU. I would recommend testing from at least one North American location and one European location. Countries within Europe may have slightly different laws, so testing from the Netherlands (known as relatively strict) is a good choice.
Results
We need a test subject to use as an example for the following sections. I wanted to use a website which implements cookie consent, but is not heavily driven by third-party content (i.e. not a digital publisher). Corporate websites are great for this, so that's what we'll look at.
The headlines are:
- Opted out experiences are ~35% faster
- Opting in downloads 2.5MB of additional JavaScript
- Opted in repeat views are twice as slow as opted out
The following sections go into a bit more detail about each test. Below are links to the test results:
First View Comparison
This is the most common type of comparison you are likely to perform, what does a full page load look like with and without consent? I've used the handy wpt-compare.app by Matt Hobbs to make this a little easier 🙂

The visual performance comparison shows relatively little difference between the initial render performance as we would expect, except for the visual addition of the cookie banner. The total load time was somewhat higher for the opted-in test, at 5s vs 4.2s for opted-out.

Looking at more of the timers we can see some significant degradations. Notably, CPU Busy Time increases 2.5x from 4.9s to 12s, indicating that the third-party content has a significant impact on the browser main thread. This could cause a laggy experience, especially on mobile devices. The visual performance of the page is impacted as well, with the visual complete time increasing by 35% from 5.4s to 7.3s.
The request maps below show the significance of the opt-in on the diversity of domains on the webpage. The number of requests increases 2.4x from 60 to 144, with an additional 30 TCP connections established.
Repeat View Comparison
Whereas first-party content is likely to be cached for a repeat view, third-party content may be downloaded again. Third-party trackers and analytics scripts will also execute on every page view, potentially increasing the relative impact of these on cached experiences.

The visual performance comparison above shows a close race, with the opted-out experience winning by a small margin of 200ms. Note that the opted-in experience filmstrip continues for another 2.5s. Again, the timers tell a more interesting story:
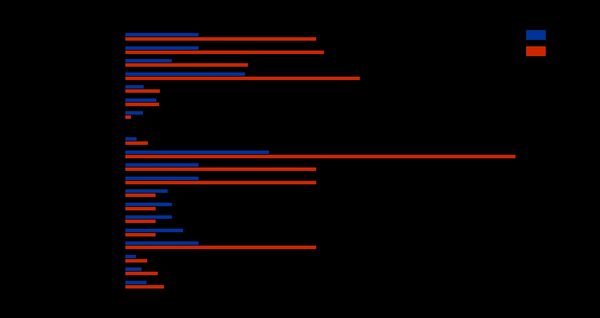
CPU Busy Time again shows a significant jump, as do the visual metrics. These show that the relative impact of the opted-in experience is much greater on cached views. Page load increases over 160% from 1.2s to 3.2s and visual complete more than doubles from 1.9s to 4.9s!
Opt-in after page load
The sections above have shown the impact of cookie consent on page load performance, but what about the actual action of consenting? Clicking the button immediately triggers a cascade of requests from third-parties, each hoping to collect as much data as possible. We can measure this performance impact by splitting the navigate and action steps, then we can analyse just the activity which occurs after the opt-in event.

Almost 2.5MB of JavaScript content is loaded across 33 objects, at a cost of 680kB of bandwidth and 1.8s of download time. Knowing this, would you opt-in to cookies? What's the performance cost for your opt-in experience?
As for the UX of cookie consent, Vitaly Friedman has written about the varied (and extensive) issues with the current state of cookie prompts. Vitaly covers this and more in his excellent closing keynote at performance.now() conference 2019.

